

For those of us who had to get users setup quickly during the pandemic you probably had to make many trips to the office to get systems imaged. I needed a process that would allow me to image systems from anywhere that had an Internet connection and join that system to the domain. With a lot of setup and testing I’ve come up with a solution that’s almost free (assuming you have an extra Windows server license.) This solution will allow you to image a system via a USB stick over the Internet and join your new system to the domain.
Prerequisites:
Active Directory Domain and Domain Controller (Windows 2012 R2 or newer)
Windows Server running Direct Access (Direct Access is an always on VPN connection back to your network. Direct Access comes with Windows server; Richard Hicks has a great course at PluralSight on implementation.
PSD/MDT Server (this is the server that images the system. Brooks Peppin has a great tutorial on how to setup PSD/MDT.)
Ethernet Connection for remote system. Ethernet over Power adapters are less than $50 on Amazon.
NOTE: (If you want to create a clean/custom Windows 10 image with updates I would suggest Donna Ryan’s WimWitch.)
Steps For Completing This Project:
- Run PS script that will create computer account on domain
- Create a custom Task Sequence in PSD/MDT
- Create custom Applications
- Insert tasks for joining new system to domain
- Create offline media
- Test imaging process
- Run PS script to enable Bitlocker and save key to AD (optional)
Run Powershell Script To Create Computer Account And Add To Groups
In order for us to join our new system to the domain we need to have a computer account setup and have it added to the “Direct Access Clients” group. This script can be run from any Windows system that is connected to the domain and has the RSAT (Remote Server Adminstration tools), installed. Your account will also need permissions to create computer accounts and add to the group.
First – download the DomainJoin-1.ps1 script.
Second – Modify the script and enter the variable names required for your environment. Run Powershell script from your system (or domain controller.) I’m using VSCode, but you can run it from Powershell prompt. You’ll be prompted for computer name. Here I’m using “Test-Remote1” as a test.
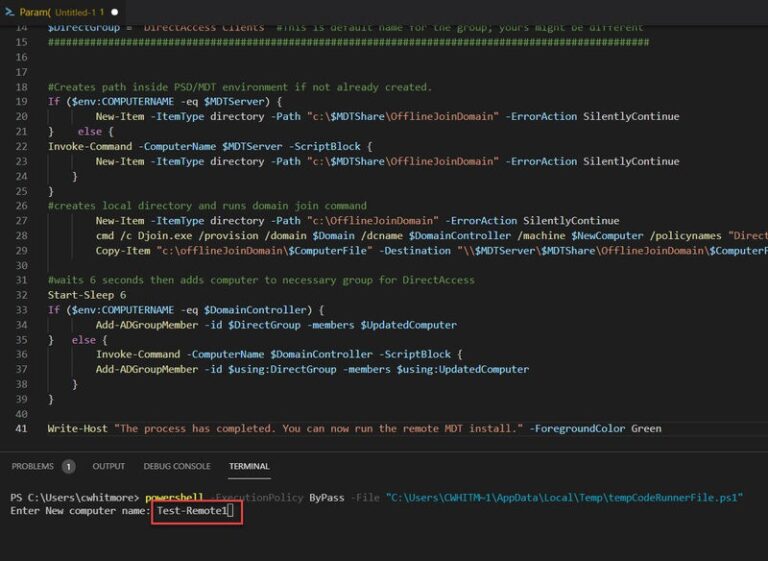
You should see the new computer account in Users and Computers and see that it’s been added to the Direct Access Clients group.
Create A Custom Task Sequence In PSD/MDT
Once you get the required servers setup (I know that was no small feat. I did it myself), we need to create a task sequence. In Brooks Peppin’s post he showed you how to modify the prebuilt Task Sequence. We want to create our own custom task sequence and test it.
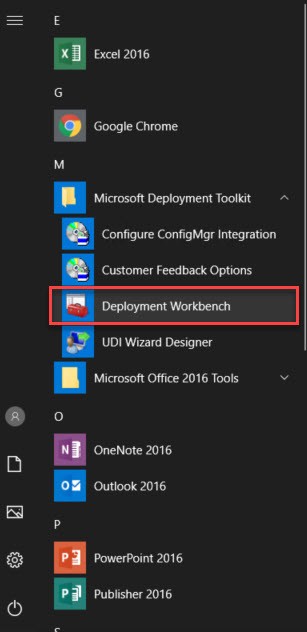
First, open up Deployment Workbench under Microsoft Deployment Toolkit on your MDT server.
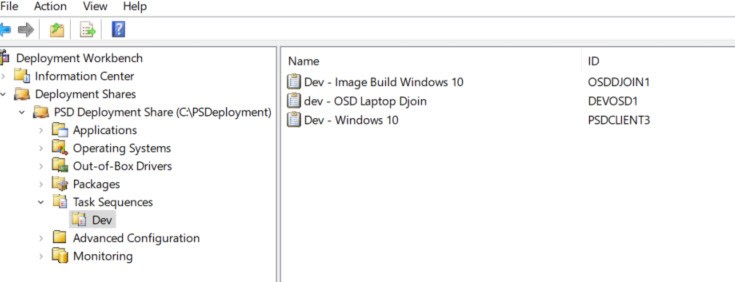
Open the Task Sequence Tab. Notice I created a Dev folder. You can do the same by right clicking the Task Sequence tab.
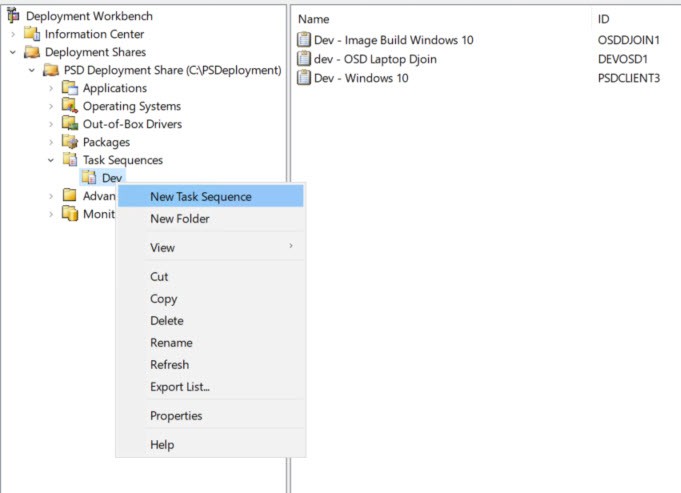
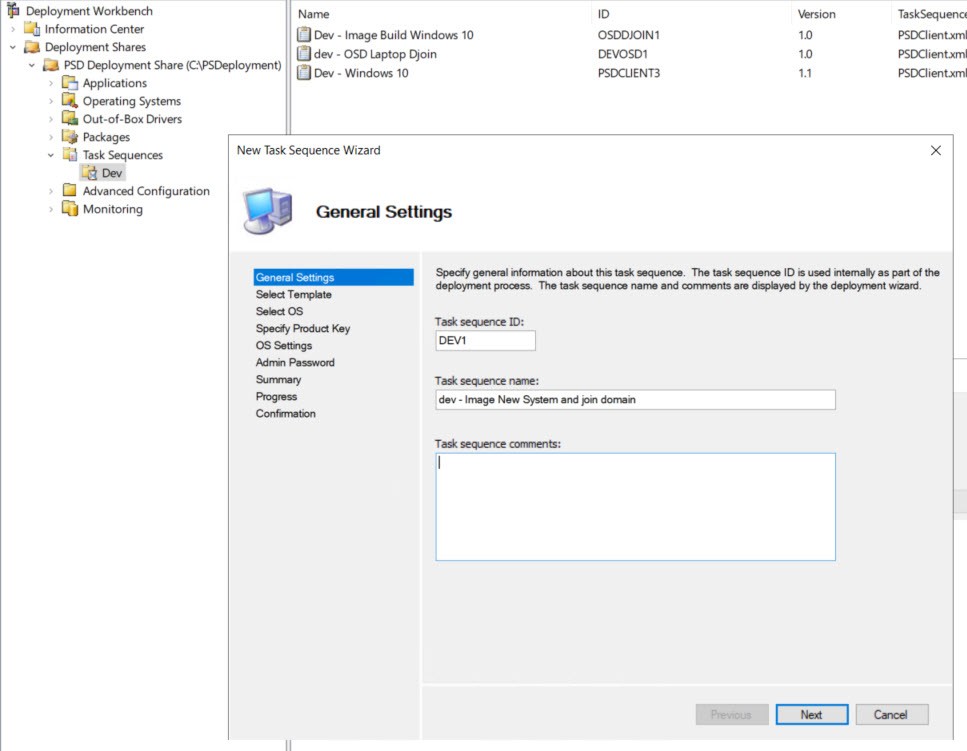
Let’s create a custom PSD client Task Sequence.
Enter ID and Name for new task sequence
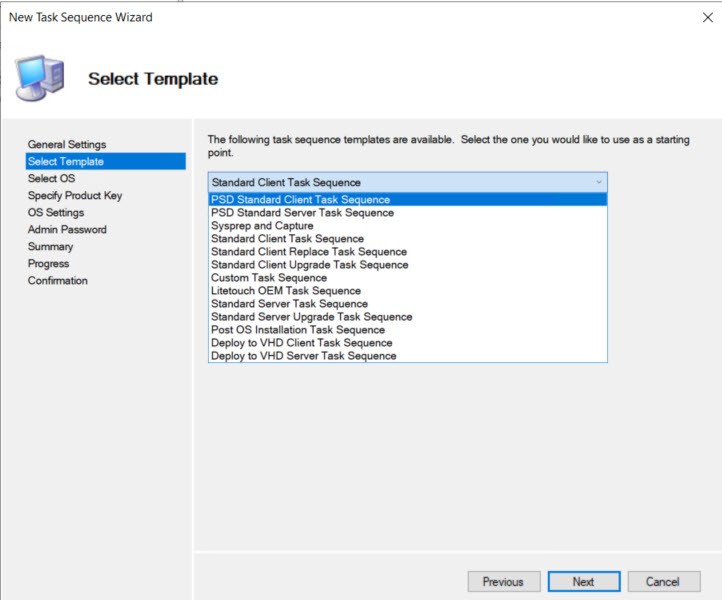
Choose the PSD Standard Client Task Sequence from the template list.
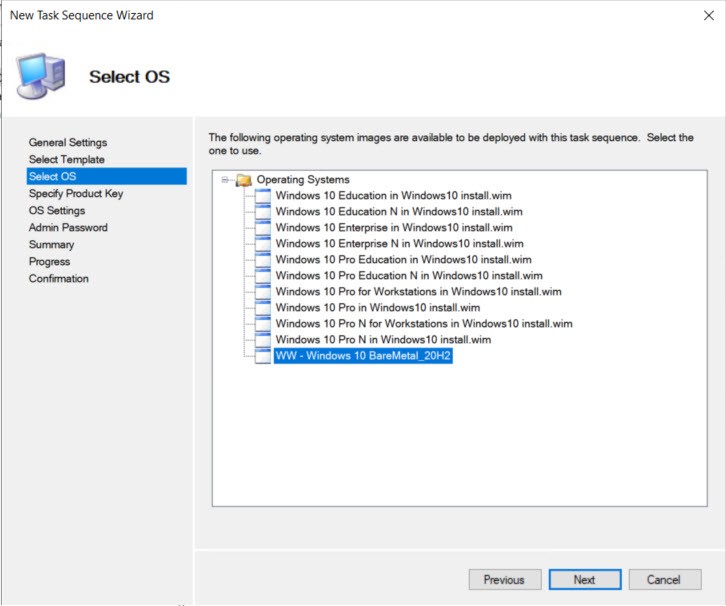
Choose the OS (I used WimWitch to create a custom image)
Specify Product key. I don’t like doing this especially if I’m testing.

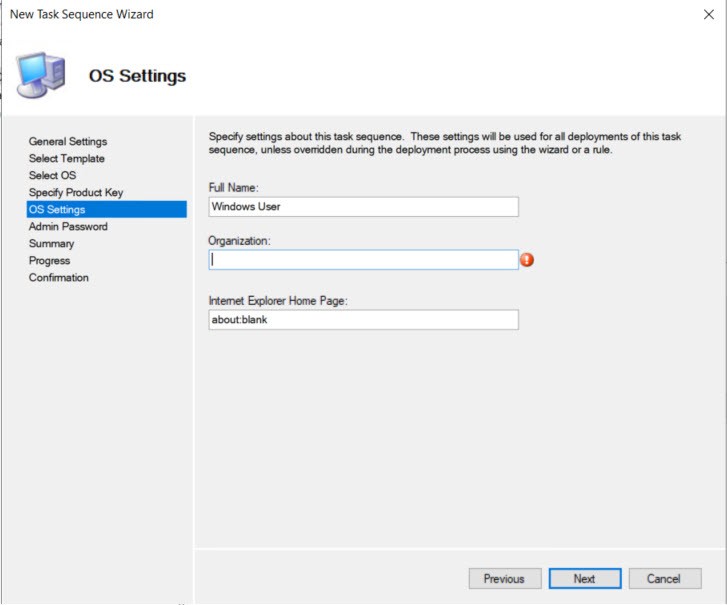
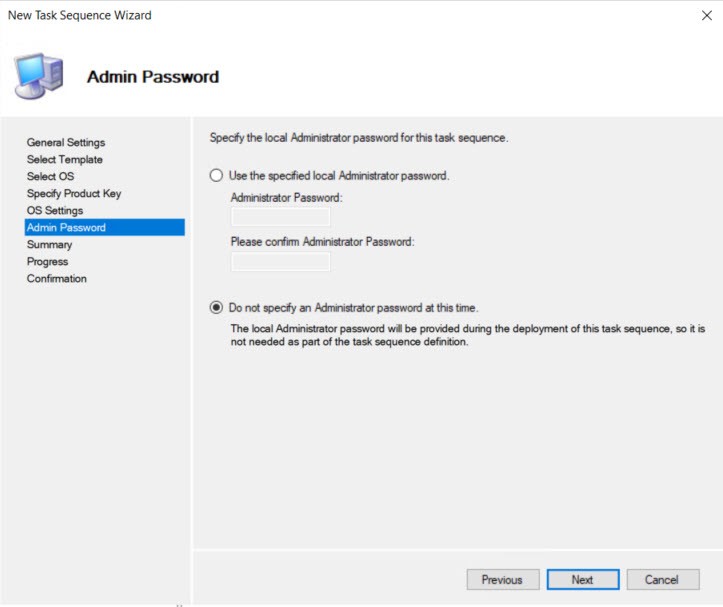
Under OS Settings the Organization name is required. You can put anything in here.
The settings ask for the local admin password, but we’ll be prompted for it again when the deployment runs so we’ll choose not to specify for now.
The next screens you can hit Next until you get to Finish to complete creating the Task Sequence.
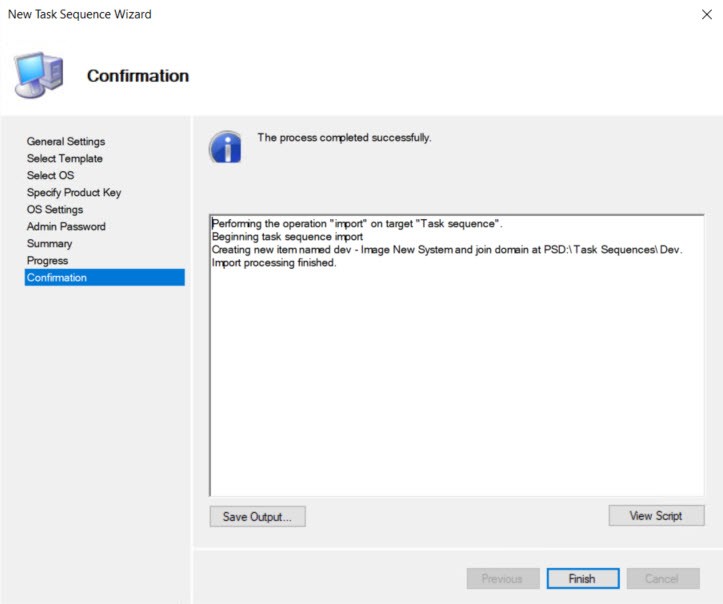
Now that we have our new task sequence let’s look through what was created.

Here is the basic PSD/MDT Task Sequence we just created. If all you wanted was a basic Windows 10 image without any apps or domain join you can stop here.

Create Custom Applications
Now that we have the basic Task Sequence setup we need to add some steps to join the domain. We’ll use the MDT Applications for these steps. (Yes, you can consolidate these steps. I left them separate so I could make testing easier.)
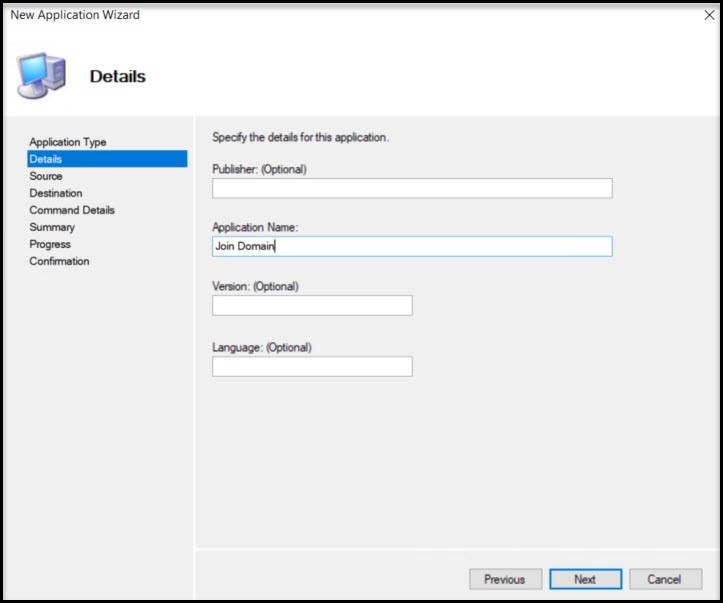
First – We need to create an application in MDT.
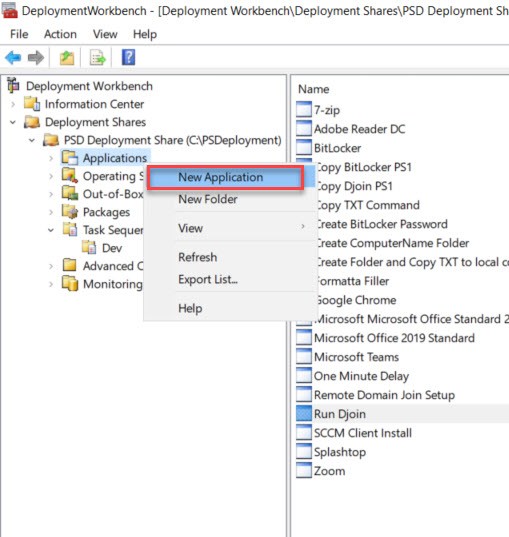
For Application Type we choose “Application without source files…”
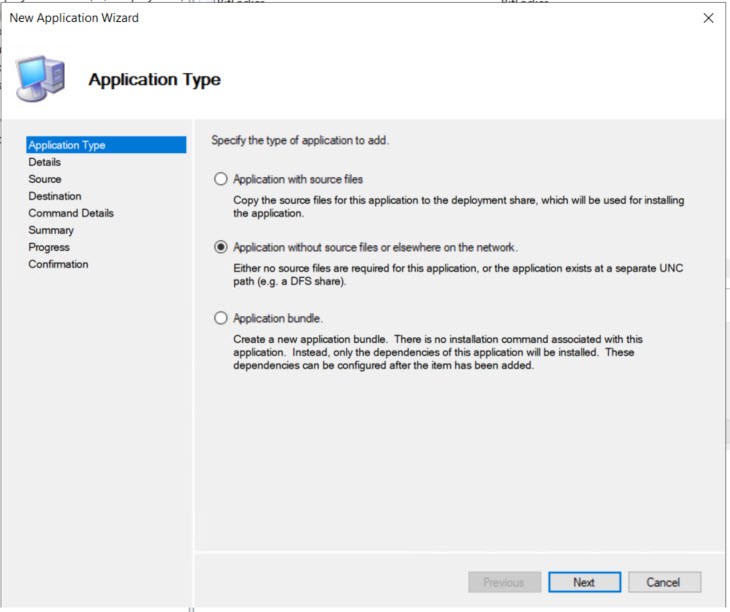
On Details page the Application Name is only requirement.
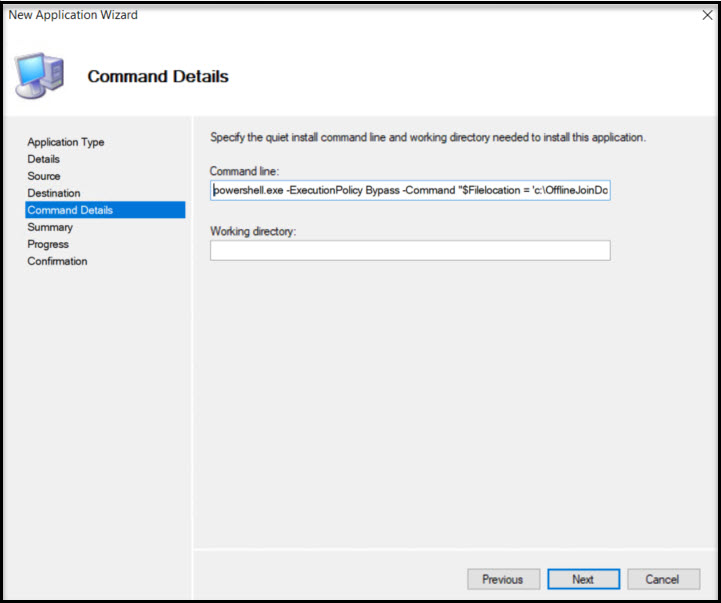
Command Details requires the command line we’ll use to run the Domain Join command. This includes the following Powershell command:
powershell.exe -ExecutionPolicy Bypass -Command “$Filelocation = ‘c:\OfflineJoinDomain\’ + $env:computername + ‘.txt’; cmd /c Djoin.exe /requestodj /loadfile $FileLocation /windowspath %windir% /localos”
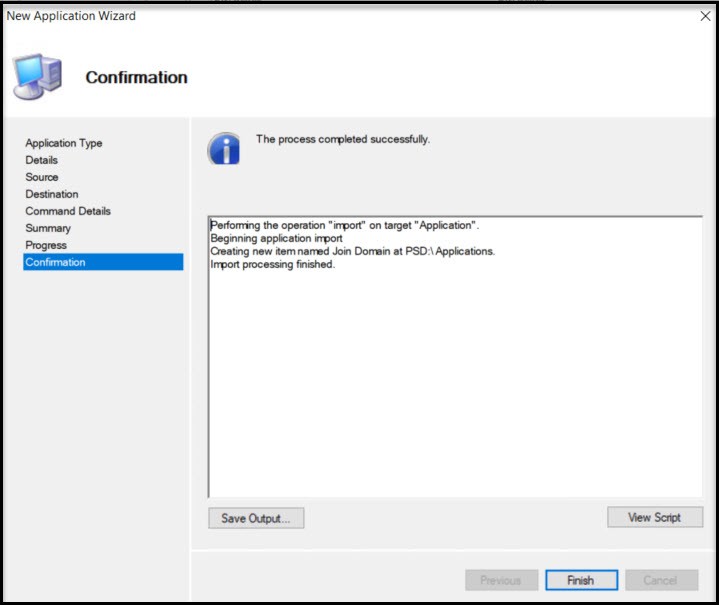
Hit next to get to Finish screen.
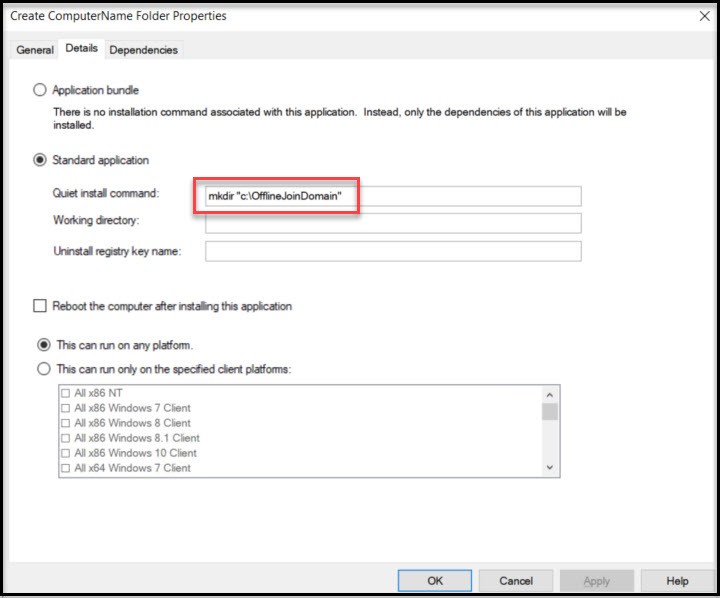
We have the Join Domain app created, but there are two apps we need to create in addition to this one. We need to create the folder on the new computer (c:\OfflineJoinDomain)
Create a new Application called “Create ComputerName Folder” and follow the first two steps of creating an application. Next, name the Application. For Command Details you’ll use this:
mkdir “c:\OfflineJoinDomain”
We need to create one more application that copies the necessary file from our MDT server to the new computer. We’ll create a new application just like in the previous step and name it “Copy TXT Command”. The command you’ll use is:
xcopy *.* “C:\OfflineJoinDomain\*.*”
The working directory will be .\OfflineJoinDomain

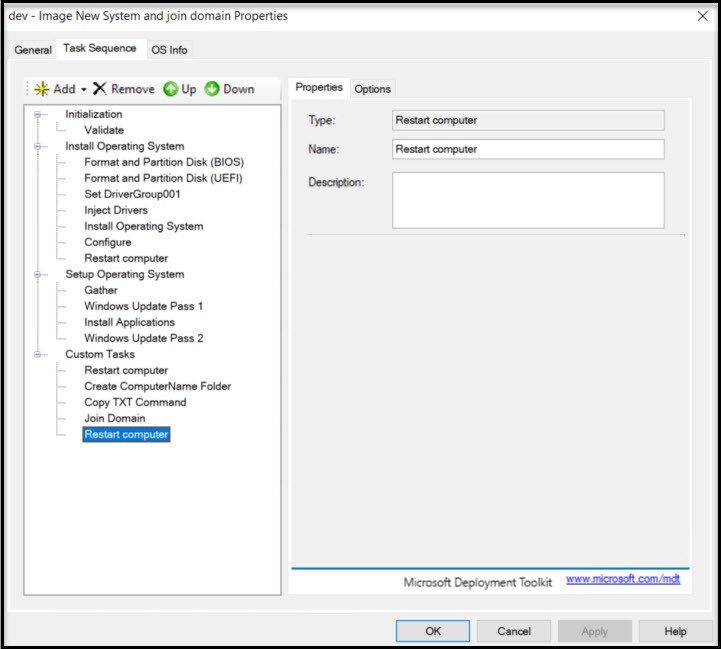
Now that we have the necessary Applications created we can add tasks to our newly created Task Sequence “Image New System and join domain” or whatever you called your Task Sequence. From the Task Sequences dropdown Right mouse click our Task Sequence and choose Properties and navigate to the Task Sequence tab.
Now that you have the Task Sequence open choose Add -> General -> Install Application
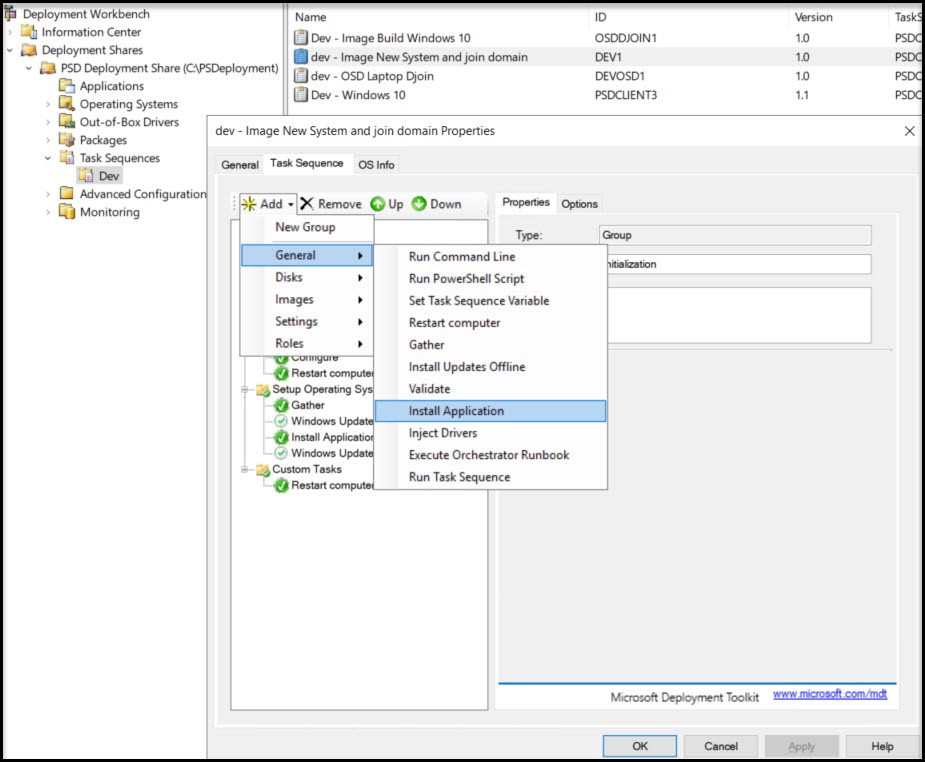
From the New Application screen you need to name the application step then Choose Install Single Application and choose “Create ComputerName Folder” by hitting Browse… When you hit Apply you’ll notice the step name didn’t change on the top left. If you move to another step you’ll see the new name.
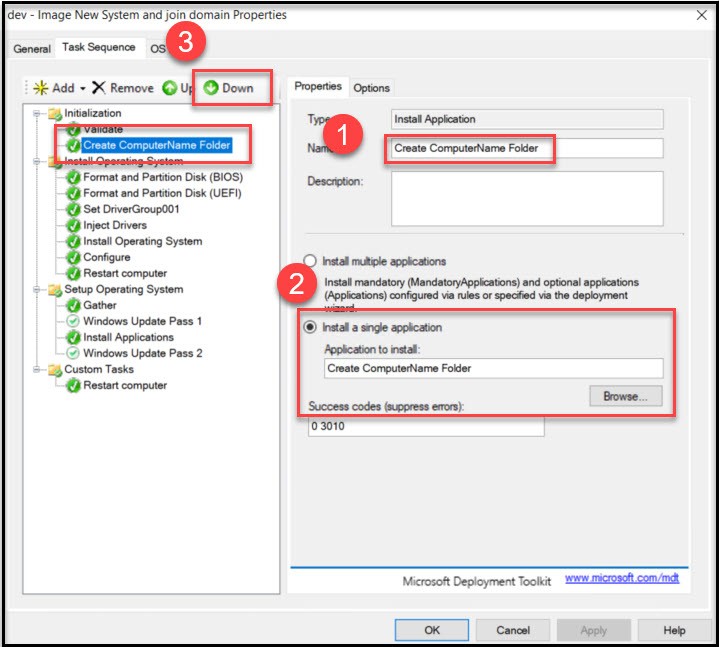
Now move that step to the very bottom of the Task Sequence by using the Down button.
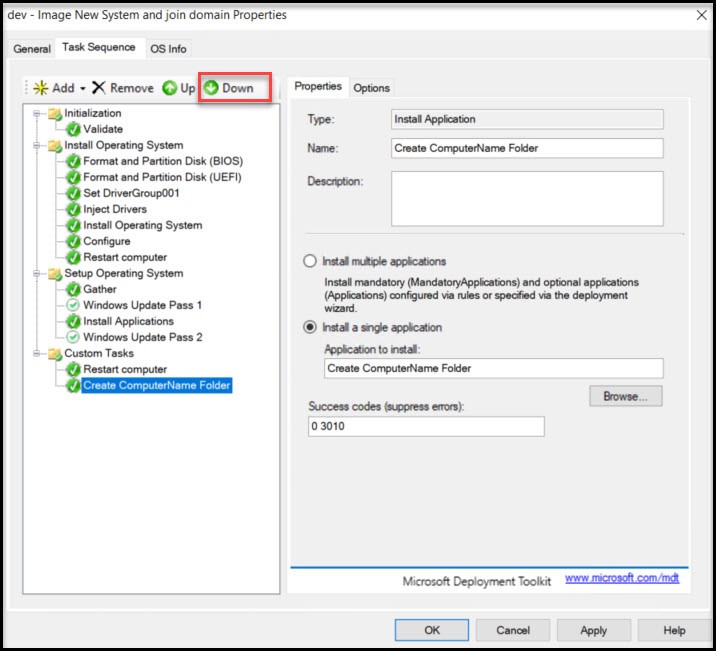
Okay, we need to add the two other applications steps. Choose Add -> Install Application again. This time we’ll add the “Copy TXT Command” app. You’ll notice that the step created just where we need it (at the very bottom.)
Our last application to add will be the “Join Domain” application to the bottom.

After the Domain Join command runs it requires a reboot. Add -> General -> Restart computer

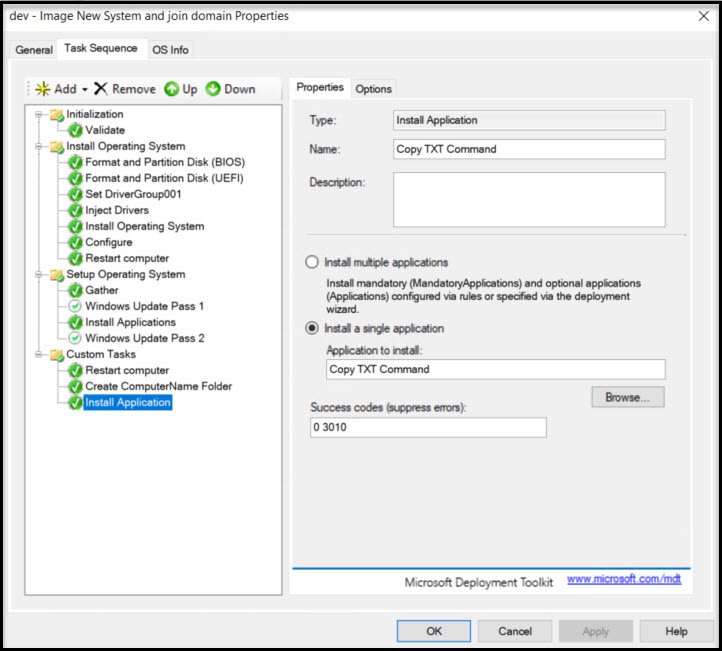
This is what your final Task Sequence should look like.
Create Offline Media
For this step you’ll need a USB stick (2GB or larger is fine), to boot on the new computer. Let’s find the ISO we need for this step. Navigate to your MDT share on your PSD/MDT server. Mine is at c:\PSDeployment\Boot on the server and copy the file PSDLiteTouch_x64.ISO to your local system.
We need a way to burn this to the USB stick and make it bootable. My favorite tool for this is Rufus.
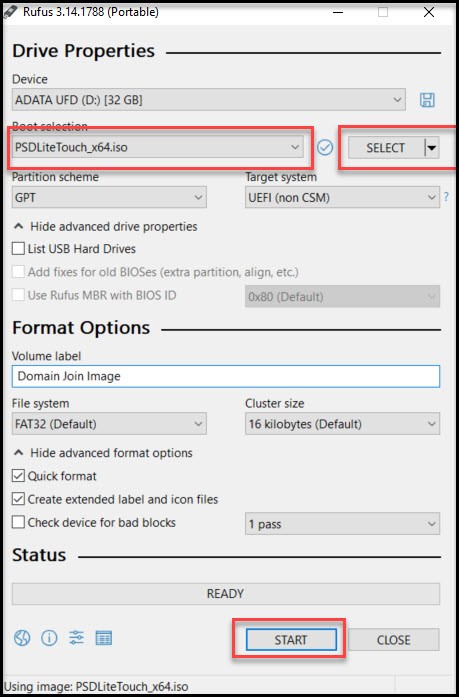
After it’s finished you can hit Close and our USB stick is ready to boot on the computer we’re imaging.
Test Imaging Process
Okay, after all this hard work we need to test out our image setup. You can test this on a physical computer, but I would suggest first testing from a virtual machine (it’s much faster.) Windows 10 Enterprise and Pro come with Hyper-V so can setup a virtual machine there. Make sure you either change the BIOS or stop the boot process to change the boot order to point to our USB stick.
Settings For My Virtual Machine In Hyper-V:
- Generation 2
- 2 Processors
- 4192 RAM (uncheck dynamic)
- Turn off Checkpoints
- Add SCSI DVD (attach the .ISO we downloaded)
- Security – Disable Secure Boot, Enable Trusted Platform Module
When you boot from USB (ISO file), you may see some wavy lines initially on the screen. Disregard this it will clear up. As the USB/ISO boots it will run through some tests (hope you unchecked Dynamic memory?), finally you get this screen.
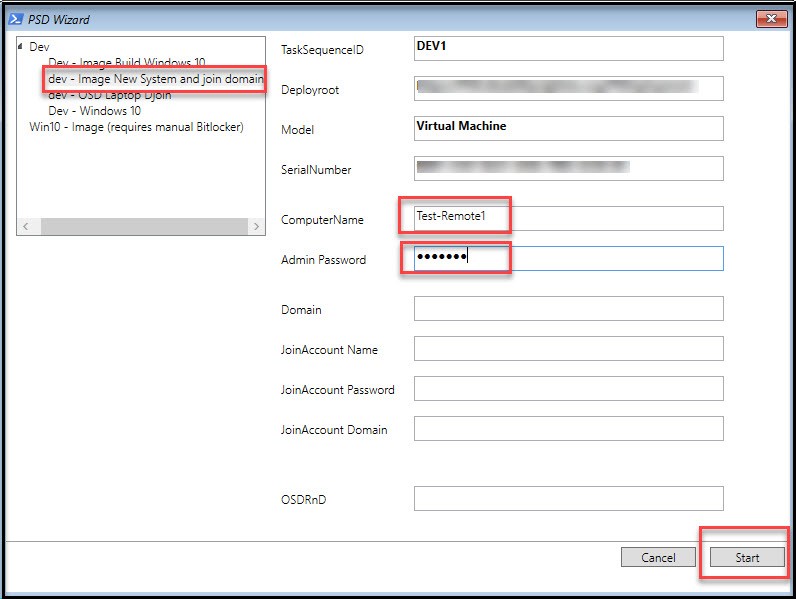
Choose the correct Task Sequence at top left, then enter ComputerName (name we setup in PS script), then enter the local admin password. Don’t forget this step or you won’t be able to access the computer.
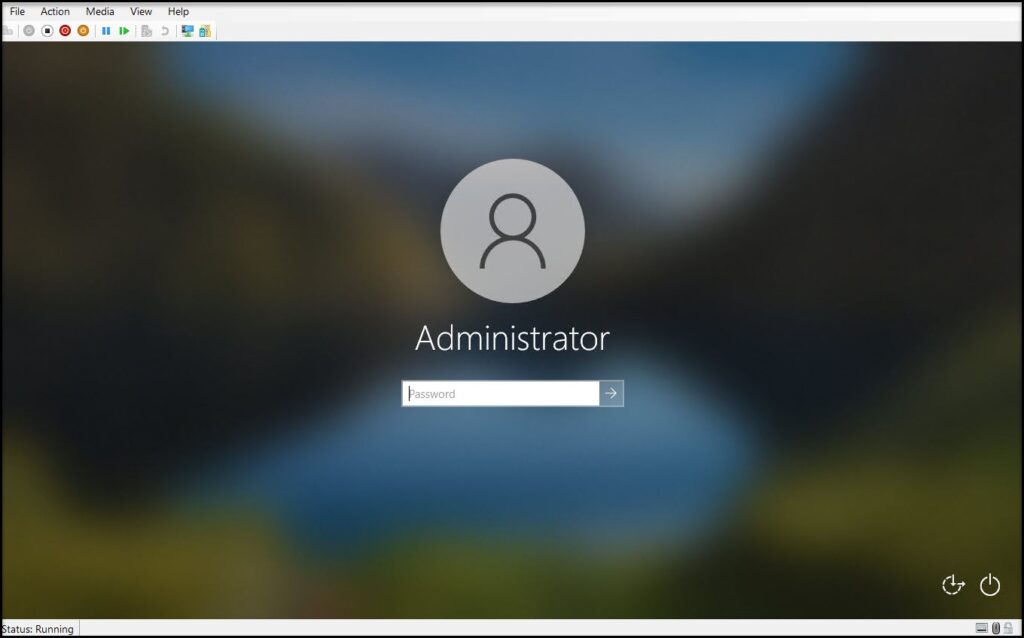
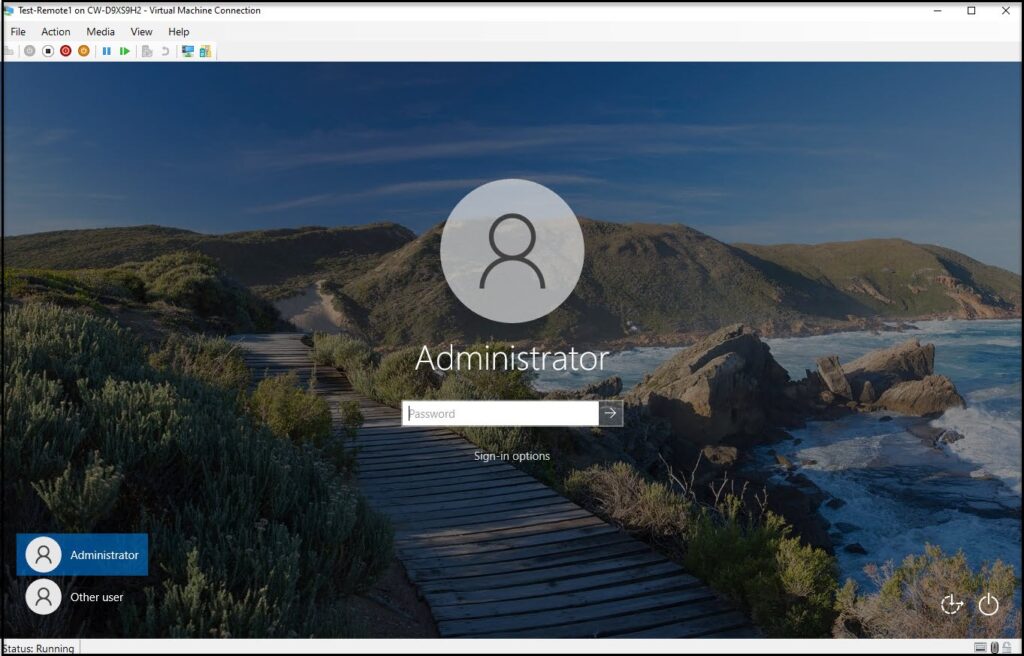
After the Windows image has been installed it will reboot you’ll get the login screen. Login as the local administrator.
After logging in you can see that the Task Sequence is still running (The windows updates step runs twice and takes a long time. If you want you can disable this step for testing.)

After the last reboot in the Task Sequence you’ll be back at the login screen. The fact that you see “Other user” at the bottom left shows us that the domain joined worked, but let’s login as local administrator again to make sure.
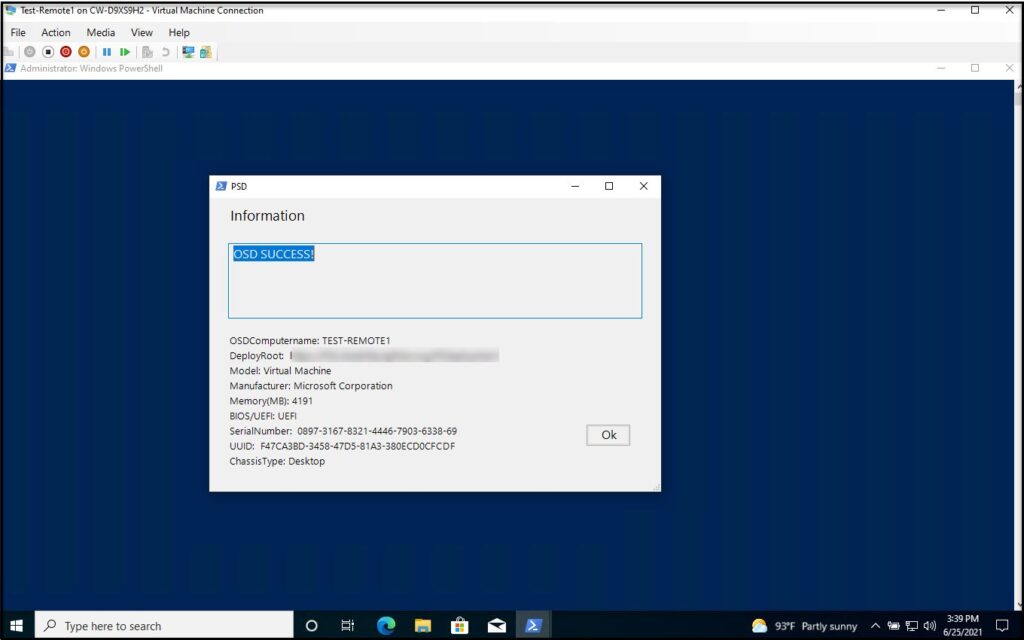
When we login as local administrator it should show the image OSD has completed.
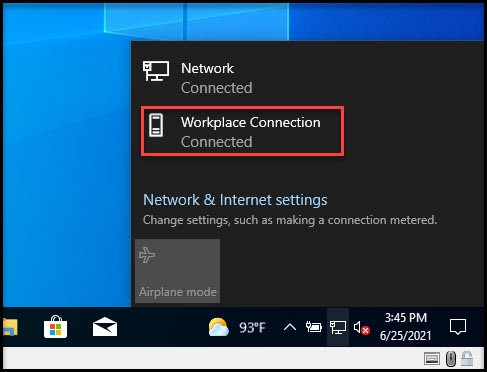
Now the big test is to logout and log back into the domain with a user account. If you’re able to login to the domain you should see the following Workplace Connection status as “Connected”. If it shows “Connecting”, reboot your system, wait a couple of minutes and try again.
They said it couldn’t be done, but here you go, bare metal imaging and domain join over https!
If you’re up for some more fun I have a script that automatically enables Bitlocker and sends the key to Active Directory.
Run PS Script To Enable Bitlocker And Save Key To AD
I tried implementing this with the domain join, but my testing was hit or miss depending how how fast the imaged systems could connect to DirectAccess so I created this easy Powershell script to allow you to run it after the imaging process.
For this to work you need to have TPM enabled your test virtual machine or on the system you imaged. Also, make sure UEFI is enabled and not BIOS.
First – download and copy the Powershell script from GitHub to your newly imaged system. (One is for virtual machines only bitlock-VM.ps1 and bitlock.ps1 for physical machines.) For future imaging you can drop these scripts in c:\PSDeployment\OfflineJoinDomain in your MDT server and they will get copied to the imaged system automatically.
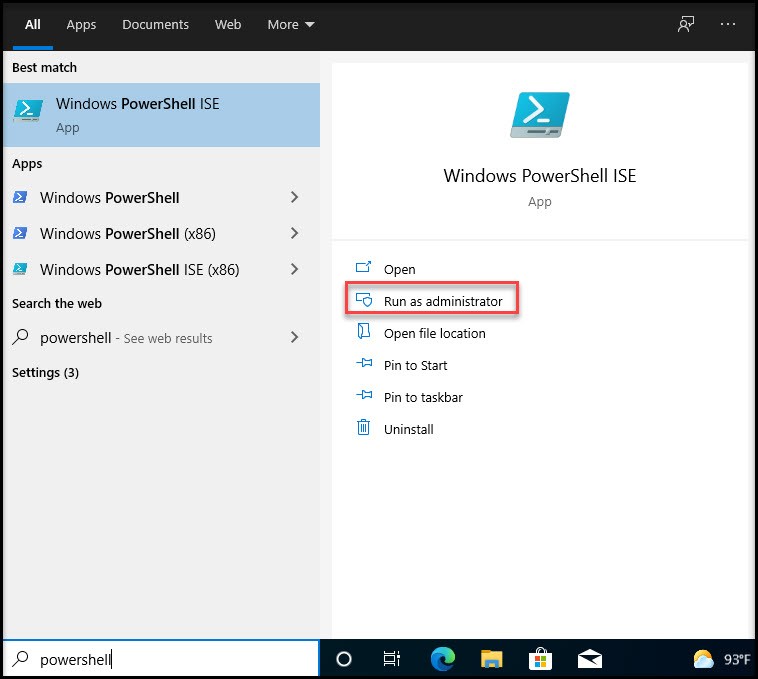
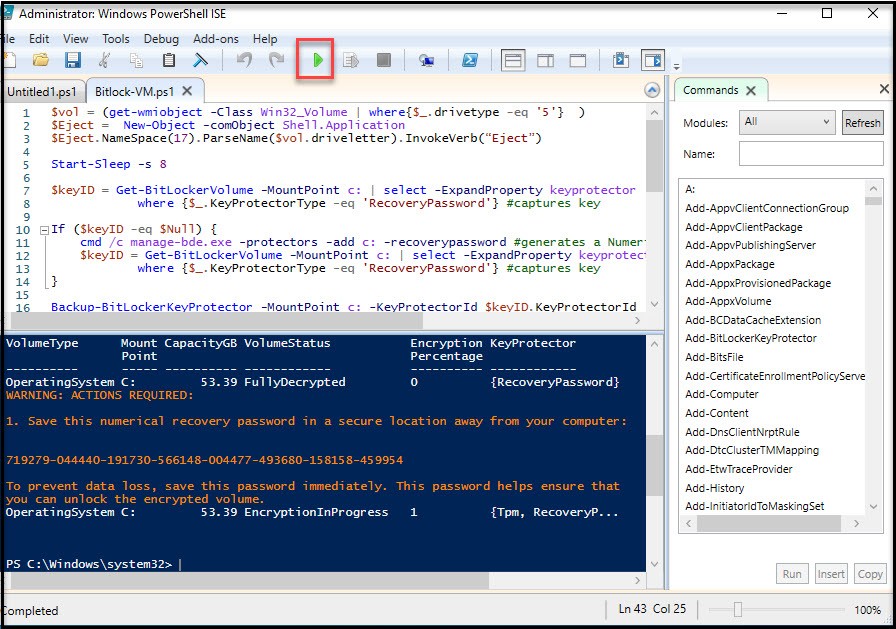
Open up Powershell ISE and Run as Administrator
From the Powershell ISE open the powershell script (bitlock.ps1 or bitlock-vm.ps1) and set the execution policy. (“Set-ExecutionPolicy -ExecutionPolicy Bypass”)

Now we can run the script. Just hit the play button at top. If you get errors make sure you’ll still connected to the network. You’ll get some warnings about saving the key, but we just did save it to AD!
Now, let’s verify that it’s actually encrypting.
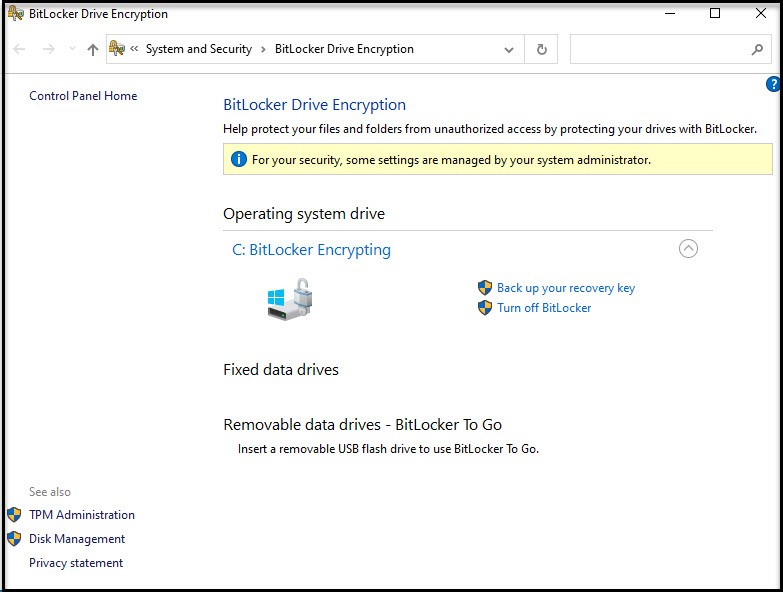
So far, so good. Now the real test. Did it save the key to Active Directory? Open Users and Computers and navigate to the computer we just created and open properties then open the BitLocker Recovery tab. (If tab is missing checkout this post.)
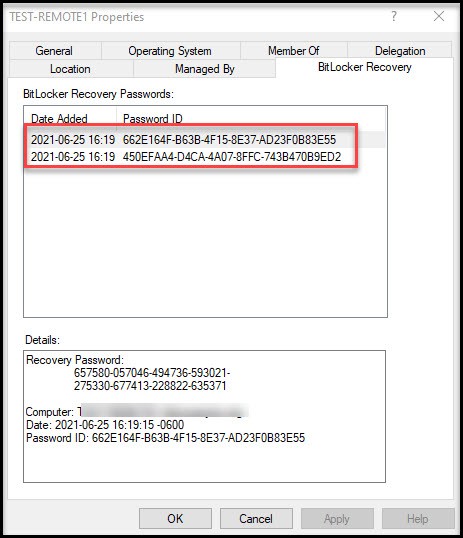
Confirmed! It worked!
In this post we created a computer account on the domain using Powershell and djoin. We created a custom task sequence in PSD/MDT for imaging a bare metal system with custom commands to allow for automatic domain join over https. We created offline media (USB stick), and booted our new system to connect back to our PSD/MDT server. We ran the task sequence from the USB stick. After the new system was joined to the domain we took it a step further and enabled Bitlocker and copied the Bitlocker key to Active Directory.
I hope this post was useful and saves you trips to the office!
References: