Table of Contents
ToggleLooking for a way to auto enable BitLocker on all of your Windows 10 and Windows 11 endpoints?
Microsoft allows for setting up BitLocker settings in Active Directory through GPOs (Group Policy Objects), but there isn’t a built-in option to turn on Bitlocker. (I guess Microsoft doesn’t trust us!)
I needed a way to enable this during laptop/PC imaging. I found the best way to do this is with a GPO. If you’ve tried this you’ll know that there are some snags that make it a little more complicated. I’ll go over those issues in this post.
Disclaimer: Always test before rolling this out to production systems.
Agenda
Requirements:
-
Active Directory Functional level 2012 R2 or Higher
To find the functional level open "Active Directory Domains and Trusts" from the server management tools then right mouse click the domain displayed and choose Properties.
-
Access to Domain Controller
You need admin privileges to make changes.
-
Domain joined Windows 10 or 11 client
BitLocker does not support Windows 10 or 11 Home edition so you'll need Pro, Education or Enterprise edition.
-
Save BitLocker recovery key in AD enabled
Active Directory does not come preconfigured to save the BitLocker recovery key so we'll need to enable that. I have a blog post you can reference here: https://www.techhelpfornonprofits.org/2023/02/19/how-to-save-bitlocker-recovery-key-to-active-directory/ (you can stop after enabling the feature)
-
TPM enabled on device
Whether you're running a VM or physical device, the TPM chip has to be enabled. This can be done in the BIOS settings. NOTE: If the TPM chip was already enabled you might need to clear it.
-
Secure Boot enabled (optional)
Secure Boot is not required to enable BitLocker, but recommended.
Copy Powershell script
Before we create our GPO for BitLocker we need to copy the Powershell script that does two things. First, it dismounts any removable media (BitLocker won’t work if there are any removable storage devices mounted), it then enables BitLocker and stores the recovery key in Active Directory.
After copying the the script save it to a shareable location. For demonstration purposes I’ve saved the script to \\domain.local\NETLOGON\BitLocker.ps1
				#Used to enable Bitlocker on physical or HyperV VMs.

#Checks to see if BitLocker is already enabled and exits script if it is.
$checkBitLocker = Get-BitLockerVolume -MountPoint "C"
If ($checkBitLocker.ProtectionStatus -eq "On")
{
    Exit
}

#Dismounts external device
$vol= (Get-WmiObject -Class Win32_Volume | where {$_.drivetype -eq '2' -or $_.drivetype -eq '5'}  )

foreach ($disks in $vol)  {
    $Eject =  New-Object -comObject Shell.Application
    $Eject.NameSpace(17).ParseName($disks.driveletter).InvokeVerb("Eject")
}

Start-Sleep -s 8

#generates key if one does not exist
$keyID = Get-BitLockerVolume -MountPoint c: | select -ExpandProperty keyprotector |
            where {$_.KeyProtectorType -eq 'RecoveryPassword'} #captures key

If ($keyID -eq $Null) {
    cmd /c manage-bde.exe -protectors -add c: -recoverypassword #generates a Numerical Password
    $keyID = Get-BitLockerVolume -MountPoint c: | select -ExpandProperty keyprotector |
            where {$_.KeyProtectorType -eq 'RecoveryPassword'} #captures key
}

#enables Bitlocker and saves key to AD
Backup-BitLockerKeyProtector -MountPoint c: -KeyProtectorId $keyID.KeyProtectorId
Enable-BitLocker -MountPoint C: -SkipHardwareTest -RecoveryPasswordProtector
Create or Edit Existing GPO
If you followed the instructions in my previous post about setting up BitLocker with Active Directory then you should already have a GPO called BitLocker Enable so we’ll edit that one. (If you made the prerequisite changes to another GPO go ahead and create a new GPO.)
We’ll start by opening Group Policy Management on the Domain Controller and opening the BitLocker Enable GPO then choosing Edit.
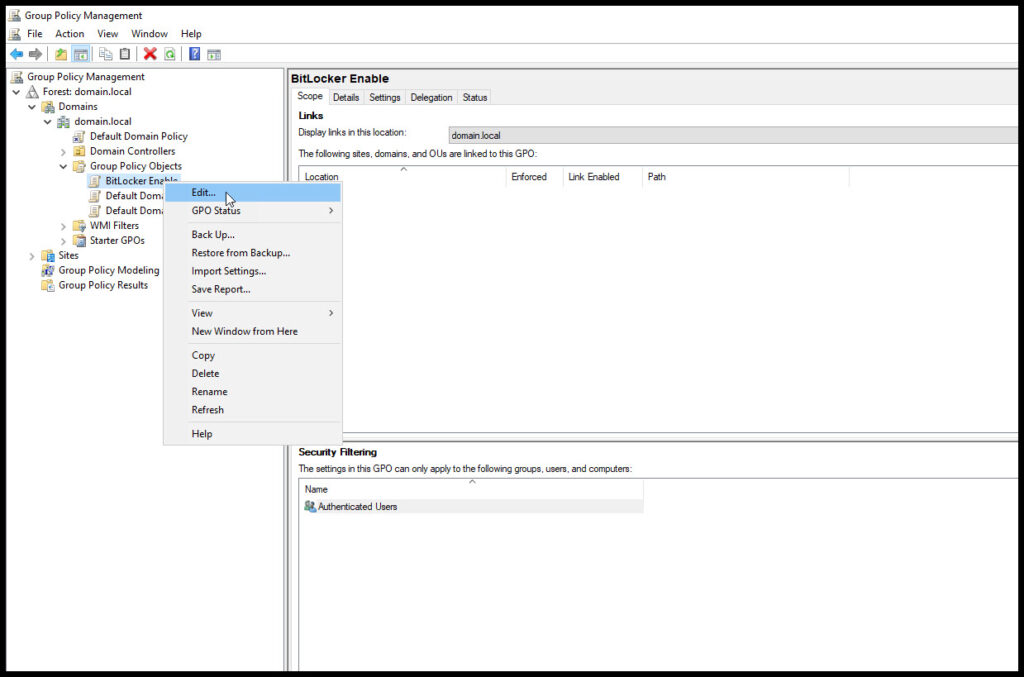
Now, navigate to Computer Configuration, Policies, Windows Components and BitLocker Drive Encryption and open Store BitLocker recovery information in Active Directory Domain Services.
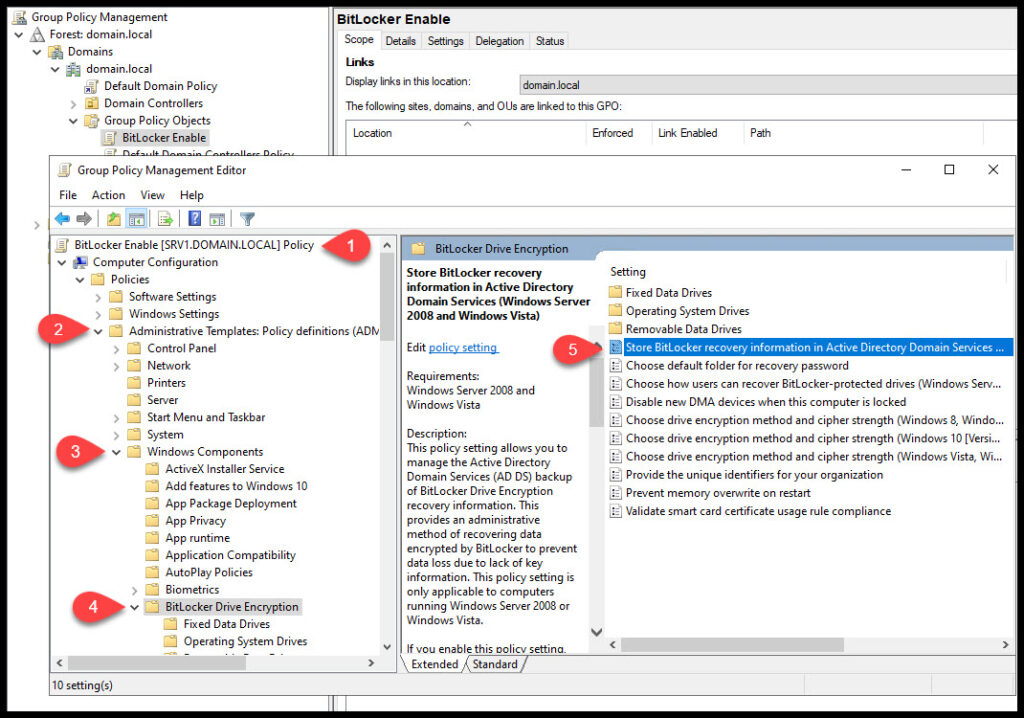
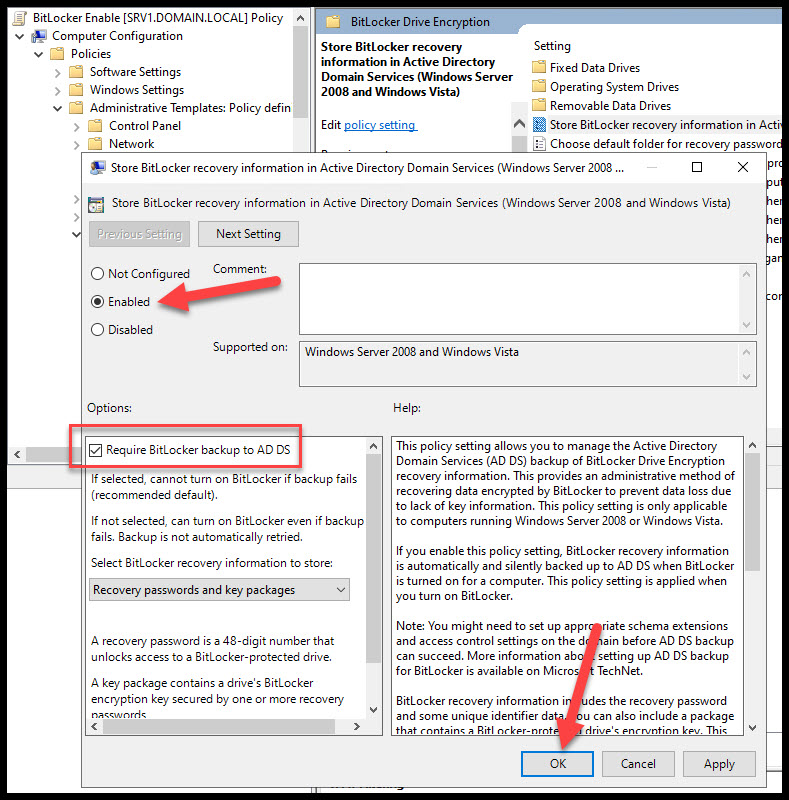
Now that you have the Store BitLocker recovery… option open, enable it and check the box “Required BitLocker backup to AD DS” and hit OK.
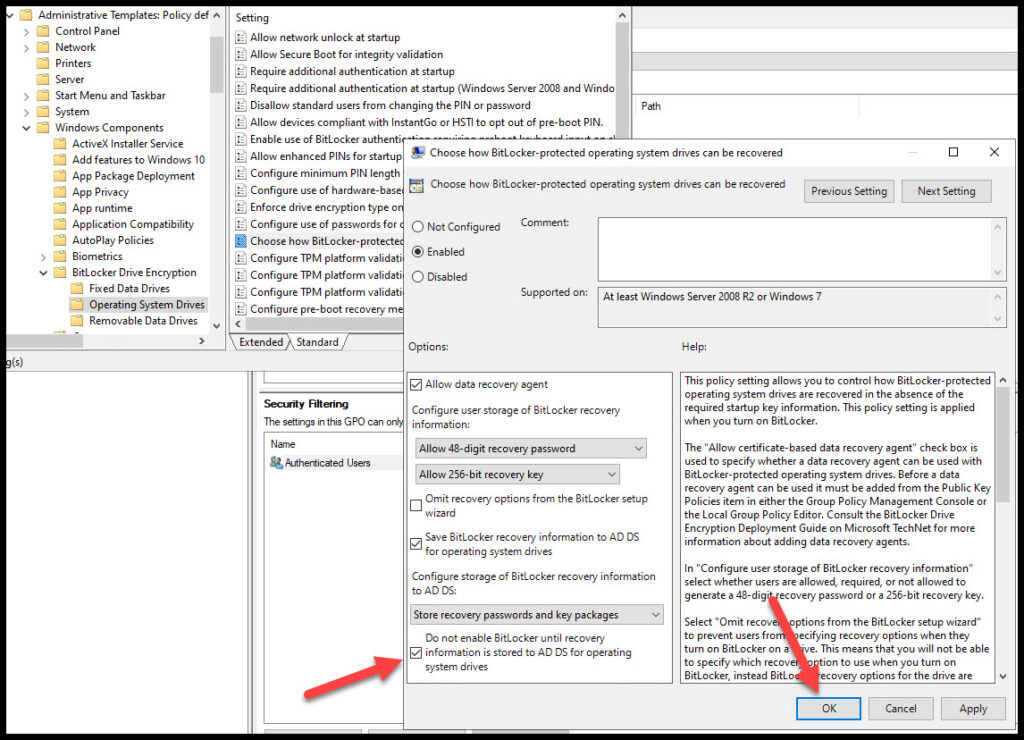
Under BitLocker Drive Encryption click on Operating System Drives and open “Choose how BitLocker-protected operating system drives can be recovered“. This should look familiar since this option is already enabled (from adding BitLocker recovery key to AD), but we need to enable one more option “Do not enable BitLocker until recovery information is stored to AD DS for operating system drives” then hit OK.
Add Scheduled Task in GPO to enable BitLocker
This is where I ran into some issues getting BitLocker to turn on. In order to run the script in Task Scheduler, it requires the System account and some creative command like magic to get around the UAC requirement. Follow closely!
From same GPO “BitLocker Enable”, navigate to Computer Configuration, Preferences, Control Panel Settings, Scheduled Tasks then in the empty box choose New, “Scheduled Task (at least Windows 7)”.
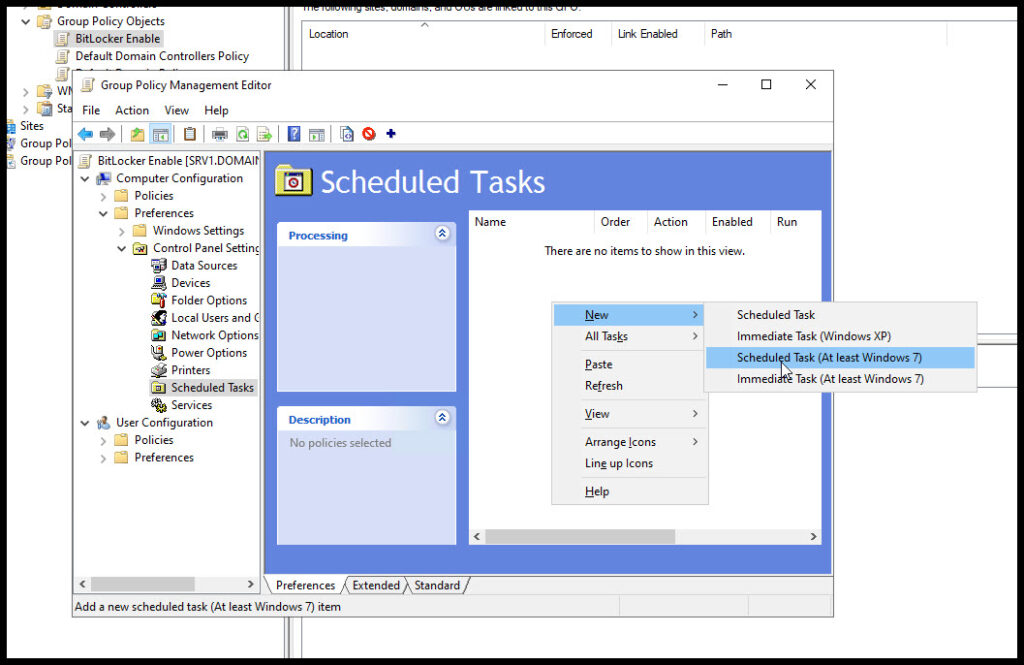
After choosing to create a new task you’ll get this screen. Make sure you give it a name with exact setttings as shown on the screenshot. (This has to run as System or it won’t work.) After these settings are configured hit the Triggers tab.
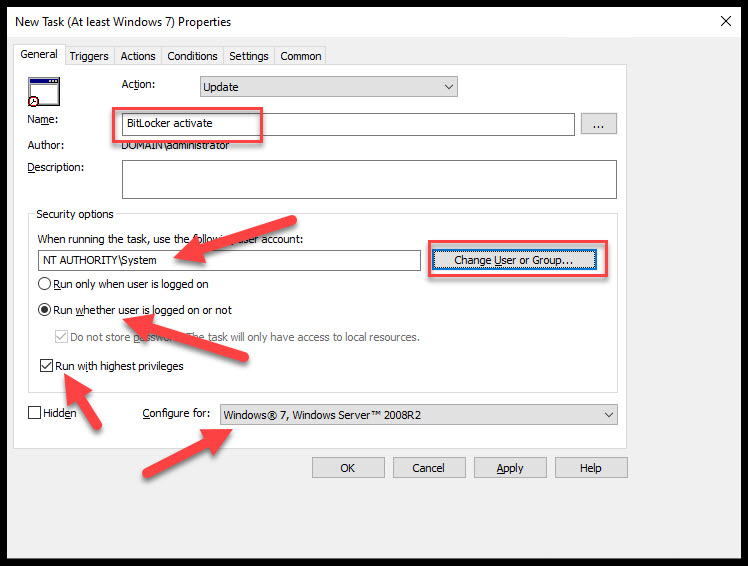
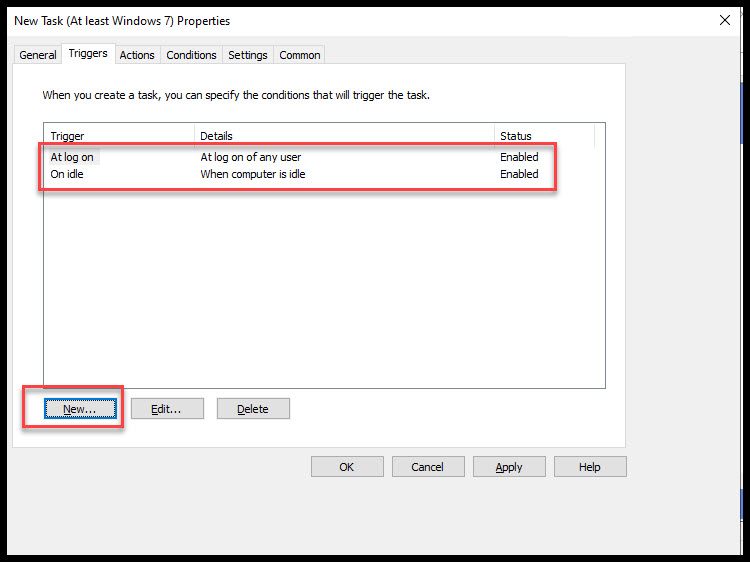
If you’re not in the Triggers tab go there now and add two triggers. Use the defaults for both. Hit New and choose one for At log on and On idle then hit the Actions tab.
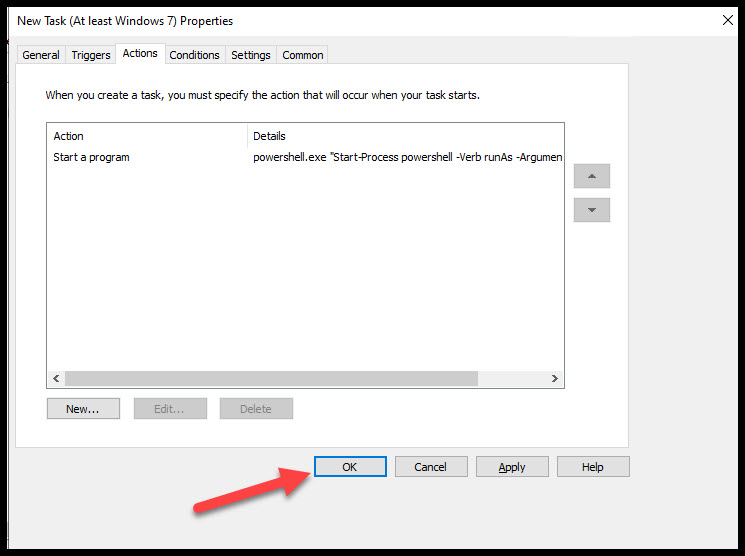
After making changes above, open the Actions tab and make sure Action is Start a program. In the Settings make these changes:
Program/script: Powershell.exe
Add arguments(optional): “Start-Process powershell -Verb runAs -ArgumentList ‘\\domain.local\NETLOGON\Bitlocker.ps1′”
NOTE: Make sure the double and single quotes are exactly like they are here. I would suggest testing the shared location from a client computer to verify I have access to the script.
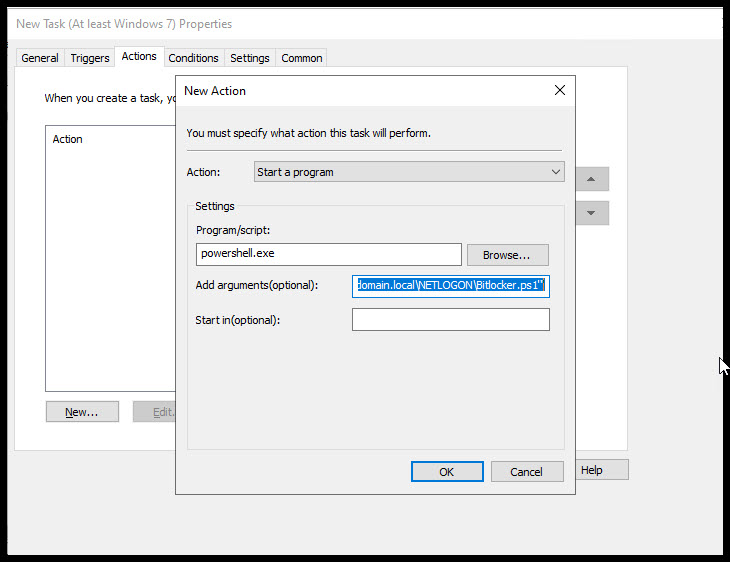
After making changes to the Actions tab hit OK. This takes us back to the New Task, hit OK again to save the task.
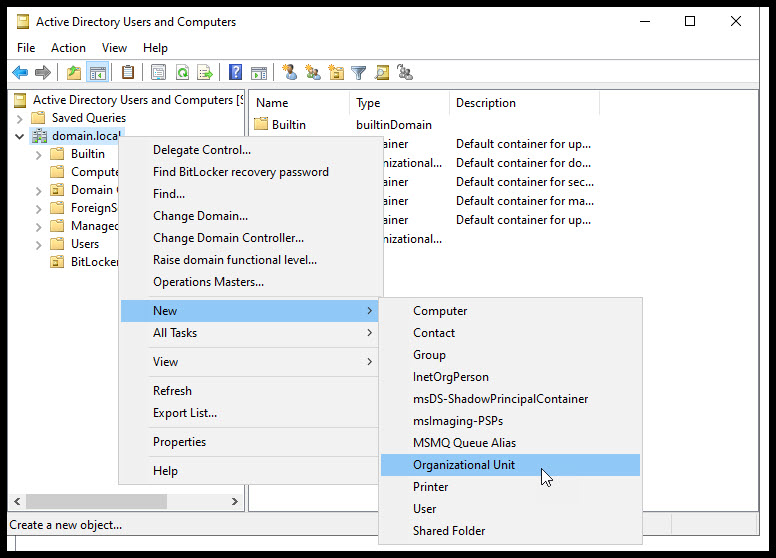
Create Organizational Unit in AD
We have two more steps to get this working. First, we need to create an OU (Organizational Unit) to link our GPO and move our test computer to that OU. From the Domain Controller, open Users and Computers and create a new OU or use an existing one. I created one called BitLocker Test.
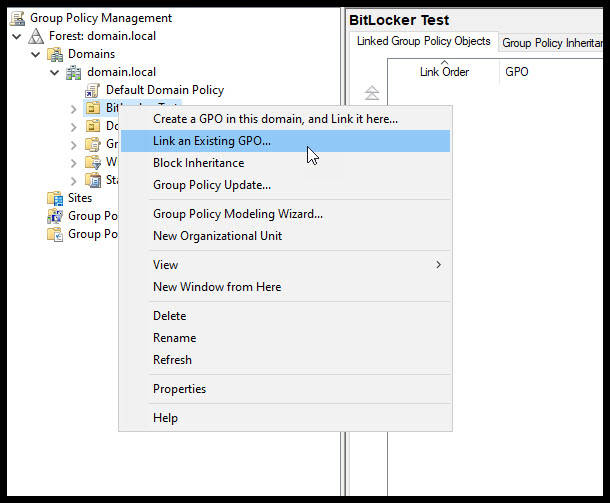
Now we need to link our new GPO to the new OU we created then move our computer that that OU. Okay, it was really three steps not two. Let’s open Group Policy Management and right mouse click the new OU and choose Link and Existing GPO…
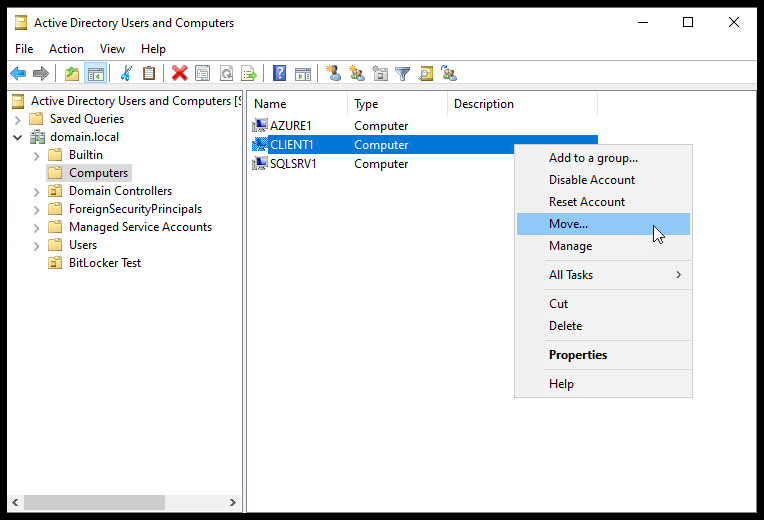
Move Computer to OU and Test
Our final step before testing is move the test client computer to our new OU.
Lets login to client test computer running Windows 11 Pro and test this out by updating the Group Policy using the command gpupdate /force
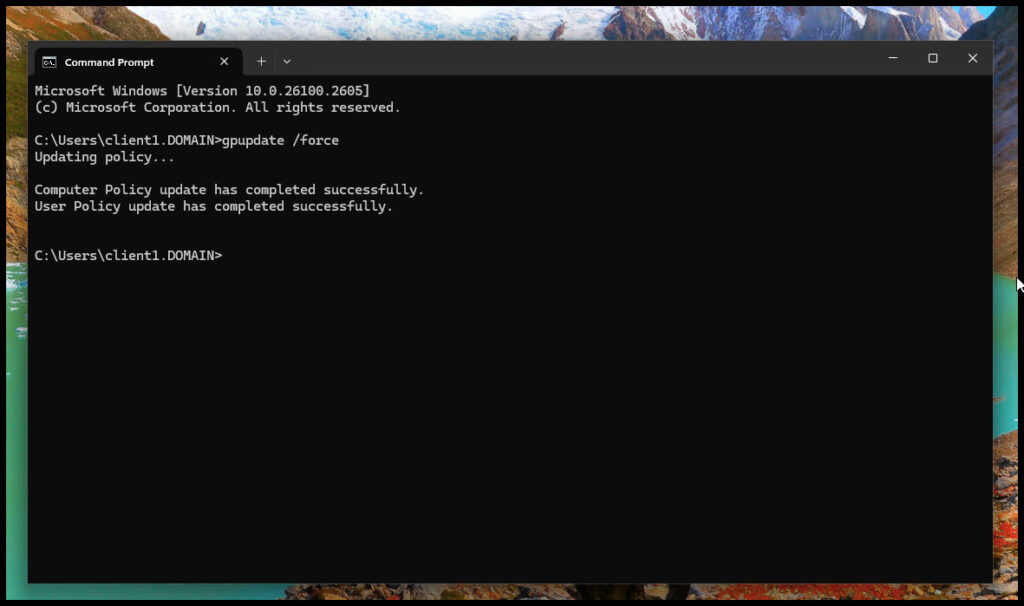
That should have created the scheduled task. To verify open Task Scheduler as admin and see if it’s there.
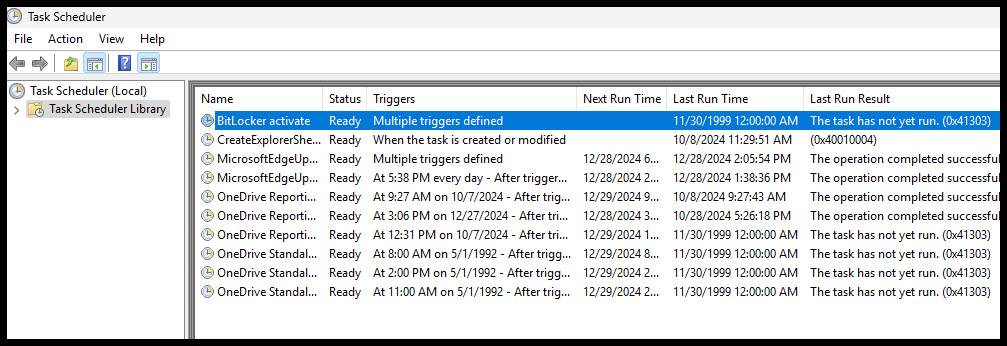
Remember we added two triggers, one was if the system was idle and one when the user logged in. Windows takes awhile to become idle if ever so we’ll reboot and login in again to trigger the task.
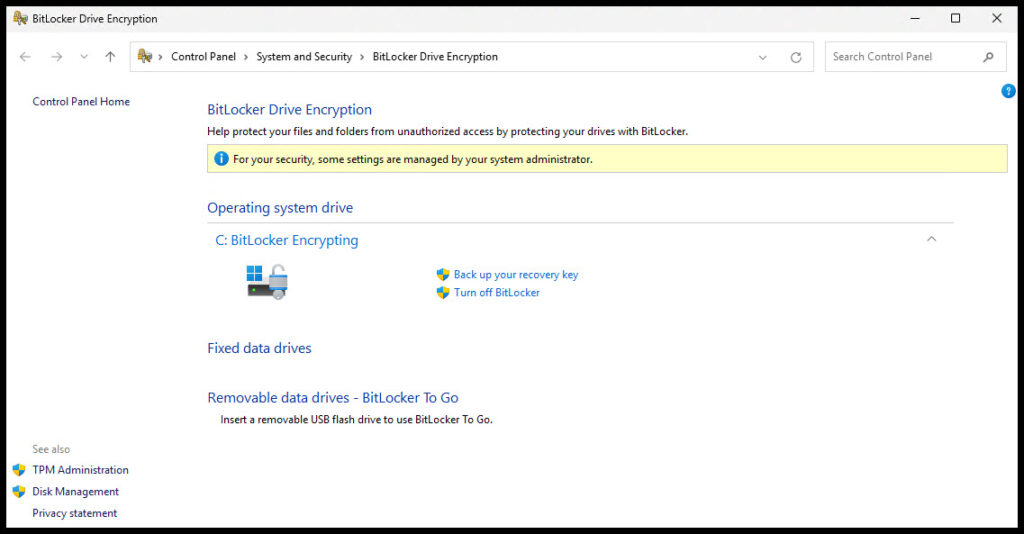
If you open Manage BitLocker from the search bar on the client computer you should see BitLocker has started encrypting the drive. Be patient. Encrypting might not start for a few minutes.
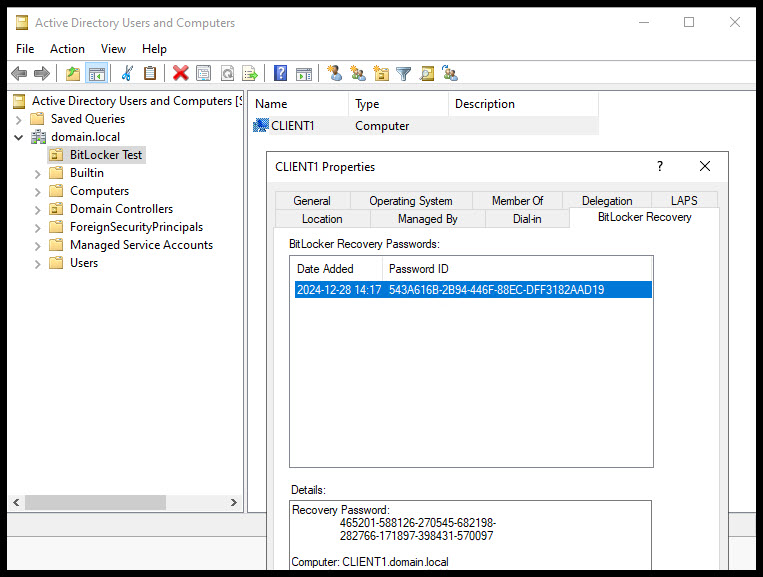
One last thing to check, did the recovery key get saved to Users and Computers? Open Users and Computers and navigate to the client computer and look under the BitLocker Recovery tab.
Conclusion
In this post we used a Powershell script that dismounts removable storage, encrypts our OS drive using BitLocker and saves the recovery key to AD. We then setup a GPO to allow for saving recovery keys to AD. We then modified that GPO to run a scheduled task that bypasses UAC and allows us to run the shared Powershell script.
I use this script when imaging new systems, but you could use this on existing systems in mass. As always test this procedure before rolling it out!

